Sunday, December 30, 2012

DIY: Fabric Softener

Homemade Fabric Softener:


Ingredients:

6 - cups Hot Water
3 - cups White Distilled Vinegar
2 - cups Hair Conditioner (any brand)
1 - Empty Gallon Container
 
Directions:
In large (microwave safe) bowl, mix the vinegar and hair conditioner together

Place the whole bowl in the microwave and heat for a minute or two.
This will ensure the ingredients will blend together more easily.
 Remove from microwave and stir.

Add hot water and mix to make sure everything is blended.
Pour mixture into a one gallon container and store in laundry room.

Use the same amount you normally use in a rinse cycle (approx 1/2 cup).

Note: Add to fabric dispenser department, downy ball or directly in the second rinse cycle. Before each use give the bottle a good shake to mix it up. 

Thursday, December 20, 2012

Super Moist Succulent Brownies

* This Is The BEST homemade brownie recipe I have found so far! Please give this one a try and I'd love to hear your feedback to find out how they turn out! *

You Will Need:
1 1/2 Cups all purpose flour
2 Cups Sugar
1/2 cup plus 2 TBS. Cocoa
1 tsp. Salt
1 cup vegetable oil
4 eggs
2 tsp. Vanilla

Mix all ingredients together.
Pour into a greased 9 x 13 pan
Bake at 350 degrees for 30 minutes *
I like to dust mine with a little powdered sugar as soon as they come out of the oven. My kids love it, but that's totally optional.
Allow to cool before cutting, then ENJOY!

* If you like a more chewy, gooey kind of brownie (like me), you will want to take them out  just before they are completely done, they will finish cooking once you take them out of the oven. If you like a more "cake-like" brownie then you can cook them the whole 30 minutes. *


Friday, December 14, 2012

Homemade White Bread

Homemade White Bread
 
*makes two loaves*
 
You Will Need:
3 cups lukewarm water
1/4 cup sugar
1 1/2 Tbs. yeast (or one packet if you are using packets, I buy the jars because I use a lot! LOL)
1/3 cup oil
1 Tablespoon salt
6-7 cups all purpose flour (you may need extra to flour hands or utensils during kneading and to acheive desired consistency)
 
Here's What You Do:
(Don't get nervous! It's a lot of steps but it's super easy!)
 
In a large mixing bowl dissolve yeast in warm water and sugar.

 Let sit for 10 minutes.
Add oil
Add the dry ingredients starting with 6 cups of flour.
Mix all together
Knead the dough until everything is incorporated.  Dough will be
smooth, elastic, slightly sticky, and will pull away from the bowl.
Cover the bowl of dough with a damp dish towel or plastic wrap and let it rise
for 1 hour or until dough has doubled in size.


Punch the dough down and divide into two loaves.
Put your dough into two greased bread/loaf pans.

Then cover with a damp towel until the dough has
risen approx. an inch or two above the pan.
(about an hour)
Bake at 375 degrees for 25 minutes.
The bread will be hard on top and sound hollow when thumped.
Baste the tops of the loaves with butter to soften the crust, allow to cool
just a bit, then slice and serve.
***Note: This recipe is delicious as it is but you can also change it up and make it
a more "Italian Herb Bread" by adding some Garlic, Italian Seasoning, and Basil. Just add your
desired seasoning during the steps when you're adding your other dry ingredients!***
You can also freeze this dough and bread for later use . 
 
Please feel free to ask any questions or let me know how your bread turns out when you try it!
Come back to visit The Happy Homemaker!!  


Monday, November 26, 2012

Homemade Peppermint Bark

Homemade Peppermint Bark


Ingredients:


1 Bag "Andes Peppermint Baking Chips" (can be found  in baking section of your grocery store.)


3/4 Pack of Vanilla "CandyQuik" candy coating


Melt "CandyQuik" over a double boiler (or in microwave)
Once this is melted, stir in bag of peppermint chips
When mixture is melted and smooth, remove from heat and pour onto a baking sheet lined with wax paper
 
Put in refridgerator for a few minutes until set then break into pieces and ENJOY!!
 
 
You can adjust the amounts of the ingredients to your satisfaction.  Add as much or as little Peppermint as you like, depending on how strong you want the mint taste to be. 
Also, some folks like to add a layer of milk chocolate as well.  I like it better without the milk chocolate but this recipe in versatile and can be adapted any way you like!
 
MERRY CHRISTMAS FROM THE HAPPY HOMEMAKER! 

Tuesday, November 20, 2012

Salt Dough


Salt Dough
For Christmas Ornaments:
 
You Will Need:
4 Cups All Purpose Flour
1 1/2 Cups Warm Water
1 Cup Salt


Directions

  1. Preheat oven to 325 degrees
  2. Mix flour and salt well. Gradually add water, stirring with a large spoon. Finish mixing with hands. Knead until soft and pliable.
  3. Roll out on floured surface about 1/8 inch thick. Cut shapes with cookie cutters. Place on cookie sheets. With a toothpick make a hole in the top of the ornament for threading string. Bake at 325 degrees  until hard, about 1 hour. Decorate with paint and varnish to preserve.


Have fun!  You can do handprints, use cookie cutters to make shapes, or whatever you like!  Don't forget to make a whole to tie a ribbon to hang it by! 

Sunday, November 18, 2012

Life Hack--How To Reuse Your Swiffer Wet Jet Cleanser Container!

http://lifehacker.com/5717409/refill-your-swifter-wet-jet-no-special-tools-required

DIY:Homemade Laundry Detergent


Homemade Laundry Detergent!

Whaaatt??!!  Laundry Detergent??!!  Yep, with just a few household ingredients you can make your own laundry detergent that will work and last so much longer than store bought!


Laundry Detergent:

Grate 1/3 bar of Fels-Naptha Soap over large pot or saucepan…

•Add 6 cups of Water.
...

•Heat over medium-high until soap dissolves and melts.

•Add Washing Soda & Borax, and stir until dissolved.(1/2 cup of each)

•Remove from heat and set aside.

•Pour 4 cups Hot Water into bucket, then add Soap Mixture.

•Stir, then add 1 Gallon + 6 Cups of additional water. Stir.

Transfer to a bucket with a lid, or pour into empty laundry detergent containers.

•Set aside, and let it sit overnight, or up to 24 hours, to thicken and gel up.

•Consistency and color will vary depending on your soap & water ~ it may be lumpy and watery… kind of like a watery gel, but it works great!

•Stir or shake before each use, as it will continue to gel.

•Good job… you did it!


Monday, November 12, 2012

Homemade Yogurt

Homemade Yogurt:
 
I know what you are thinking!  Homemade YOGURT??!! Yeah right!  I promise once you've tried it, you will master it and wonder why you haven't been doing this already, so here goes!
 
 
What You Will Need:


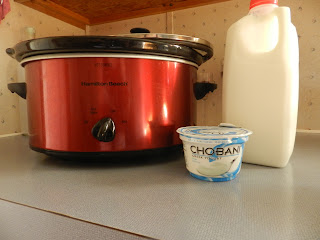
Slow Cooker
 
Half Gallon Whole Milk
 
One Cup Plain Yogurt with Live Active Cultures (this will be your starter, you will learn about this later)
 
 
Seems simple enough right??  So let's get started.
 
Just pour your milk into the slow cooker and put the lid on and cook on low for 2 hours and 45 minutes.  You may want to set your alarm or timer so you don't forget, timing is everything with homemade yogurt.
and that's it for now!
 
After 2 hours and 45 minutes have passed TURN OFF your slow cooker and let it sit for 3 HOURS be sure the cooker is OFF.
 
Next, once it has sat for 3 hours spoon a small amount of the milk into a bowl and whisk in the store bought yogurt.  (I don't have a photo for this, it was 7 a.m. and I'm not a morning person..LOL)
 
Once you have added the milk to the yogurt and whisked together, add this mixture back into the slow cooker and mix around.
 
The next step is crazy but crucial, leave the slow cooker OFF and UNPLUGGED and cover it with a heavy beach towel or blanket. This allows the yogurt to cool more slowly and thicken properly.
 
(You'll get to know me, and you'll learn that I have EVERYTHING in pink! LOL)
 
Let your slow cooker sit covered this way for 8-12 hours(or overnight) this will allow it to cool and thicken.  For me, I do 12 hours but that's just me.  You'll develop your own way too.
 
Next you get to uncover your slow cooker and see your creation!
 
Just remember, it will not be as thick as the kind you buy in the grocery store due to the additives and gelatin and such but you can actually strain it and make it thicker like Greek Yogurt if you prefer.
 
Also, remember to spoon out one cup and put aside to use as your starter for next time.
 
 
And there you have it!  One half gallon of home made yogurt to flavor any way you like.  The smaller jar is my starter for next time.  This will keep for a few weeks, and I will post more tutorials to show you lots of things you can do with your homemade yogurt!